


Mr Bullet Feeder
Mr Bullet Feeder
Setup
Q: I would like to use a mr bullet feeder for 9mm and 223 on my Dillon 650. Do I need to buy two separate units (one for pistol and one for rifle) or can I use one unit and a conversion kit?
All you need is a Mr.BF for 9mm and add a .223 conversion kit.
Q: Does the Mr.Bulletfeeder work with cast and lubed bullets?
Yes it does.
Q: Could I use the Mr.Bulletfeeder on a Dillon 550?
No, it cannot be used on a 550, as the 550 does not have a feeding system in it for brass.
Q: Will the .45 Mr.Bulletfeeder work with .44 as well?
Yes it will.
Q: I already have a fully functional tool head on my 650 for 9mm. I want to be able to use my existing bullet feeder on my 38 super tool head (already has dies, powder drop / funnel, etc.). Your description indicates that in most cases I will need to purchase another powder funnel. Is this funnel used in the bullet dropper assembly?
The powder funnel is used in the powder drop station. It is used to flair the brass open so that the bullet will sit and not tip over when you index. To set up a 2nd tool head (when going from 9 to 38) all you really need is an additional powder funnel and a bullet dropper die section. Then, you can move the top section of the dropper (from the brass section and up) from one tool head to the next.
Q: Do you know if i can modify your bulletfeeder to have "nose down" solution?
Sorry, no. at this time we do not have a solution for this option.
Q: could you tell me what I would need for the following. I am currently loading .30 Carbine 110gr FMJ + .38cal 158gr Plated & Cast & 5.56 55gr FMJ + 5.56 68gr BTHP. also 147gr FMJ .308
Your preferred setup requires the following:
9/38 caliber Mr. Bulletfeeder (for .38).
For the 5.56/.223 you would need a conversion kit .223.
For .308 you would need a .308 conversion kit.
Unfortunately it is not possible to load .30Carbine on a Mr. Bulletfeeder right now. The bullets are .30 caliber like the .308, but they are too short to effectively feed from the dropper.
Q: I have a Dillon RL550-B progressive press. Will Mr. Bulletfeeder work on it?
Yes you can use a Mr.BF on a 550. But bear in mind that the bullet dropper will use a station in your tool head, and that will leave you just one station to seat and crimp. You can use a two in one seat and crimp die for that.
http://www.doublealpha.biz/daa-2-in-1-seating-and-crimping-die
Q: Is it necessary to use the powder funnel/expander that came with the system?
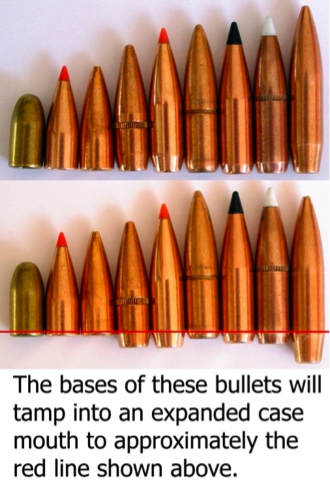
We recommend installing the new powder funnel/expander (for handgun calibers) on your press. It has been machined with a modified profile that improves bullet tamping performance while requiring a minimum of case flaring. A properly tamped bullet will not fall from the case mouth when the press is indexed. As you become accustomed to reloading with the new bulletfeeder, your reloading rate will naturally increase. The higher reloading rate will cause poorly tamped bullets to fall off of the cases during indexing. That being said, if your existing press setup prepares the cases well enough to hold the bullets in place while indexing, use of the new style funnel/expander is optional. If your system is set up for rifle caliber reloading, we suggest that you also consider using some type of case mouth expander when preparing your cases. Boat tail bullets will tamp more easily than flat base bullets, but both types will tamp into place much better by using a small amount of case mouth expansion. Expanders are available from many reloading manufacturers (example: Lyman M-Die).
Q: Is there anything special I should pay attention too while unpacking?
A: Yes. While unpacking the collator, when you remove the shipping tape from the nose guide and collator plate, you may find some tape adhesive residue adhering to those parts. Remove any residue you find… especially on the ledge area of the nose guide.
Q: Which holes should I use on the Dropper, Lower or Upper?
Q: Do you experience Double-Feeds?
A: When adjusting the dropper for a particular case height, screw the dropper down (slowly) to find the point when the bullet column drops and then add perhaps only 1/8 of a turn more for a tiny bit of overtravel. Just snug the locknut… don’t wrench it down really hard, since the die is aluminum. If you like, a drop of low to medium locktite can be applied, but since there is very little force on the die, you probably won’t need any. Your choice.
Meet Saul Kirsch of Double-Alpha Academy and Rick Koskela, the original inventor of the Mr. Bulletfeeder by Double-Alpha. The two will introduce the new system to you, and show you how to set up you bullet feeder.
Saul unpacks the Mr. Bulletfeeder by Double-Alpha, and shows you what you will find in the box, and how to start setting everything up.
Saul walks you through the steps of assembling and adjusting the mounting system for the Mr. Bulletfeeder by Double-Alpha
Rick explains the need for the custom powder funnel provided with the Mr. Bulletfeeder by Double-Alpha, and shows you how to adjust it correctly to get the perfect amount of flaring and case mouth expansion of your brass.
Rick explains the workings of his brilliant new dropper assembly. He shows you how to to dismantle and reassemble it, and shares with you the simplicity and elegance of this new patent pending design.
Rick explains how to assemble the bullet dropper to your reloading machine, what to pay attention to, and how to get it adjusted just right for best performance.
The “business end” of the collator is the nose guide and flip ramp. Rick explains how these elements work together to rotate your bullets base down. Important information in this tutorial!
Saul discusses how to adjust the output assembly, and how to fit the length of the output spring when mounting the Mr. Bulletfeeder by Double-Alpha to a 1050. And once it’s all set up, Saul demos how quickly you can reload with a 1050 equipped with a Mr. Bulletfeeder by Double-Alpha.
Adjustment
Q: When mounting the collator, what is the best angle to use?
For the majority of bullet types, a collator plate angle of 45 degrees will provide excellent results. When the surface of the plate is set to and angle of 45 degrees from vertical, the walls of the collator plate slots will also be set to 45 degrees (in a mirror image). Most bullets will easily slide down and out of the slots at this angle. Cast lead wax-lubed bullets and very long bullets may slide out of the slots a bit easier if the collator plate angle is slightly reduced. For example: reducing the plate surface angle 2 degrees (to 43) will increase the steepness of the slot wall angle by 2 degrees (to 47). This slightly steeper wall angle will help overcome some of the additional friction that occurs between the cast lead wax-lubed bullets and the slot wall. In any case, never adjust the plate surface angle to be less than 40 degrees (50 degree slot wall angle) as this will cause bullets to begin to be collated erratically in the nose guide area.
Q: Why is the collator speed adjustable?
Collator output rate primarily depends upon bullet type, weight, length and rotational speed of the collator plate. You will find that one type of bullet will collate more efficiently at a certain speed than another. Experiment with the speed setting to find the best output rate for the bullets you will be using. Use the highest speed that provides dependable performance.
Q: My output tube spring appears to be too long (or too short). Can it be trimmed shorter or stretched to make it longer?
The output tube spring shipped with your unit should be approximately the correct length for proper operation, but if necessary, you can either trim it or stretch it as needed. If you trim it shorter, dress the cut off end with a file so that bullets are less likely to be caught on a sharp edge. On a FIXED TOOLHEAD press (i.e. Dillon XL-650), you should be able to route the spring tube so that it provides a smooth path for the bullets to pass through on the way from the collator to the dropper tube. The spring tube should NOT be routed in a way that applies any significant lateral or upward tension to the dropper tube. The dropper tube must be able to freely reciprocate up and down while dispensing bullets. (related issue: also be sure to position your powder measure so that it does not contact the dropper body and interfere with its up and down motion.) On a MOVING TOOLHEAD press (i.e. Dillon Super 1050), you will need to route the output tube spring in such a way that it applies no significant lateral or upward tension to the dropper when the toolhead is in the FULLY DOWN position. Then, when the toolhead is fully UP, there will be some slack in the spring tube. This is normal, however… you may find that bullets fill up the spring tube and cause it to sag too low to allow bullets to pass to the dropper. If this happens, you might try attaching a fairly stiff wire to the casefeeder tub and shaping it to gently support the output tube spring when the toolhead is up. Remember to also check for any interference between the bullet dropper tube and the powder measure.
Q: Bullets are not being flipped properly, what is the problem?
You need to first check the position of the nose guide. Most likely it is not set correctly. Refer to the vide tutorial about setting the noise guide and flip wrap. There the process is described in detail.
Q: Bullets are piling up in the spring on my 1050, how do I resolve this problem?
The feed spring may be a little long. Consider moving your collator a little, to put more tension on the spring, or shorten it a little. Another good solution is to improvise a little support arm for the spring, to prevent it sagging too far down and creating a bullet trap in it. Refer to the video tutorial about setting up on a 1050.
Q: Bullets are dropping out from the cases once they are seated, what is the problem?
You need to adjust the powder funnel. Most likely it is a little high, and it is not expanding the brass as it should, and therefore the bullet is tipping over when you index. Refer the video tutorial on adjusting the powder funnel, and make sure you are using OUR funnel, and not the original from Dillon.
Q: How do I get the collator in the right angle?
A good starting point is to have the short vertical arm set so the plastic pucks and touching each other, and the rear vertical arm with about 6-6.5cm between the two pucks. Refer to video tutorial on this set up.
Q: What adjustments are necessary for your 9- mm plate to properly drop the shorter 380 ACP. anything more than experimenting with the spacers and ledge size? I was trying to find the right combo, and it was not easy. 9-mm works like a champ.
For short light 380 bullets it is often better to use the small output tube assembly and not the large one supplied with the 9mm and all pistol calibers. In that tube, the bullets may tend to turn sideways and get stuck. The small output assemble, as used with the rifle calibers resolves that issue.
Rifle 6.5x55mm video tutorials
223/5.56 Setup Information
Collator
The bullet collator should be hung from the reloading press casefeeder tub so that its baseplate sits level side to side, and raised up to a 45 degree pitch angle from back to front (Fig A). Some users have made custom mounts for their collators and that’s fine… just keep the base level from side to side and the pitch angle at 45 degrees.
The nose guide, plastic inserts and flip ramp will need to be adjusted for the particular type of bullet you will be reloading. The nose guide has a narrow lead-in slot (Fig B) which is used to direct the narrow tips of point-down bullets outwards and cause them drop into the large slot and then begin to be rotated towards the ramp and flipped over to point-up orientation. Bases of point-up projectiles will simply slide over the narrow lead-in slot. We suggest adjusting the nose guide position so as to expose enough of a surface to fill half of the collator plate slot when viewed from above (Fig C). This relatively large exposed surface (or ledge) will allow the bases of point up bullets to reliably transit across the nose guide and towards the output tube while still allowing the tips of the bullets to fall into the lead-in slot.

Adjusting the depth of the main slot is accomplished by using different combinations of plastic inserts. Your unit will come with 4 inserts… (2) 1.6mm thick and (2) 0.8 mm thick. When processing rifle bullets you will most likely use only one insert for shorter bullets (i.e. 55gr), or no inserts at all when using longer bullets (Fig D). The longer the bullet, the deeper the slot needs to be. (You’re most likely to use multiple inserts when reloading shorter handgun bullets.) The flip ramp should be adjusted outward enough so that approximately the outer 1/3 of the bullet can ride up the ramp as it’s flipped over to point-up orientation. The ramp may also be adjusted slightly side to side as well. For some bullets (especially longer ones), the flip ramp will work better when moved sideways towards the output tube. This will create a space between the end of the nose guide and the beginning of the flip ramp. Longer bullets will be able to slide outward in this space and assume a more horizontal orientation as they approach the flip ramp.
Dropper Tube
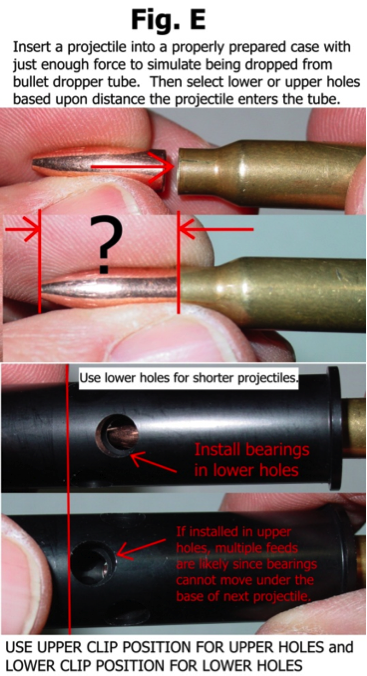
The 223/5.56 dropper tube is similar to the handgun caliber droppers in that there are 2 levels of ball bearings available for accommodating different length bullets. The hole and clip positions are also similar to the handgun versions. The upper clip position is used when the ball bearings are positioned in the upper holes and the lower clip position is used along with the bearings in the lower holes.
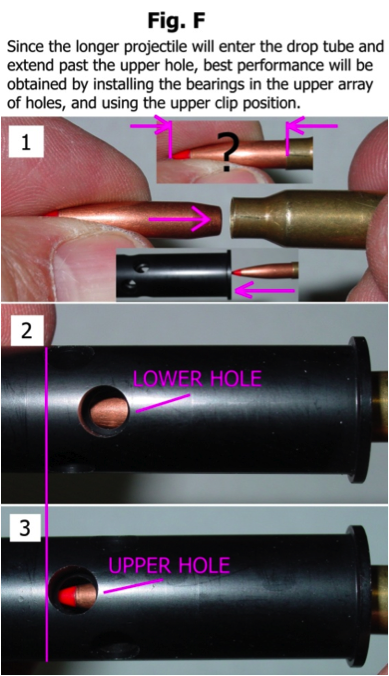
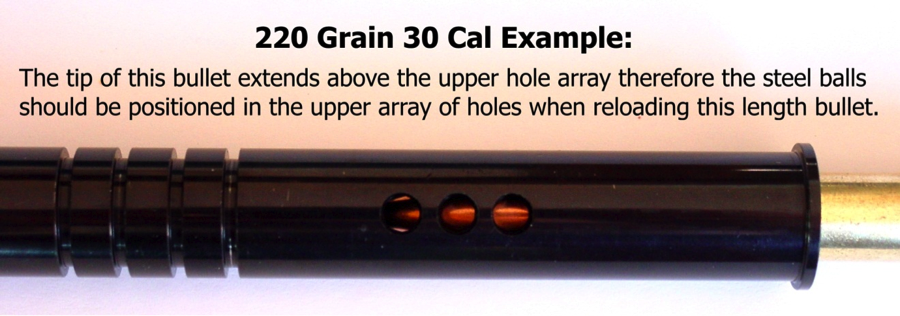
Generally, the lower bearing hole/clip position will be used for typical length 55 gr bullets. Longer, heavier bullets will exhibit better tamping performance in the dropper tube when the upper bearing hole/clip position is used. This is because they will fall a greater distance to the case mouth. Greater falling distance means greater acceleration due to gravity, and therefore more tamping force is available to tamp the bullet into the case mouth.
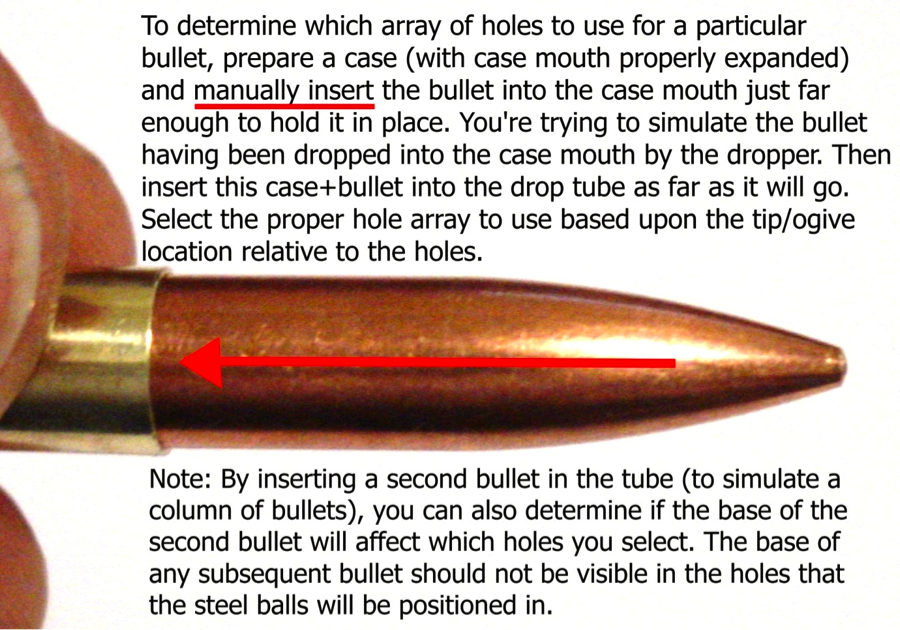
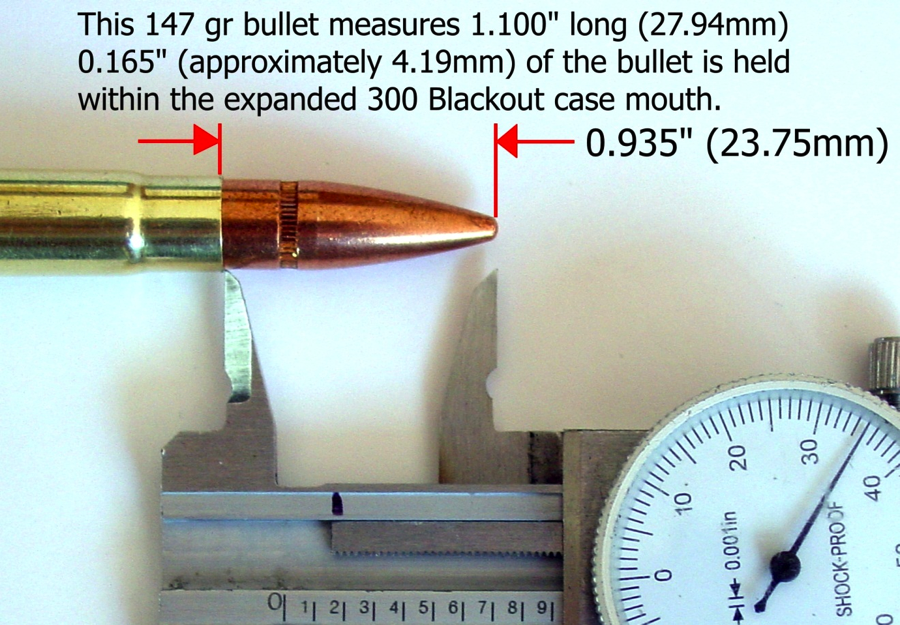
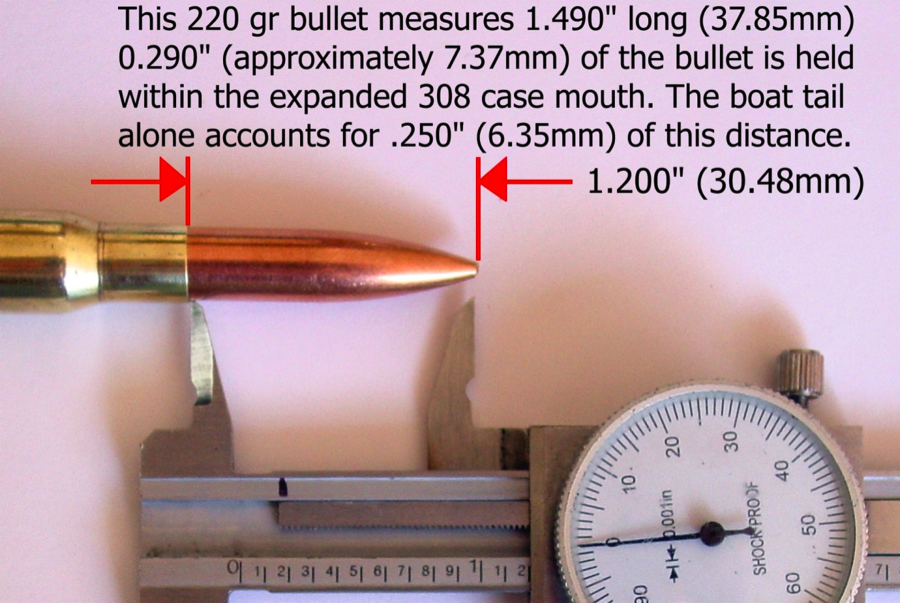
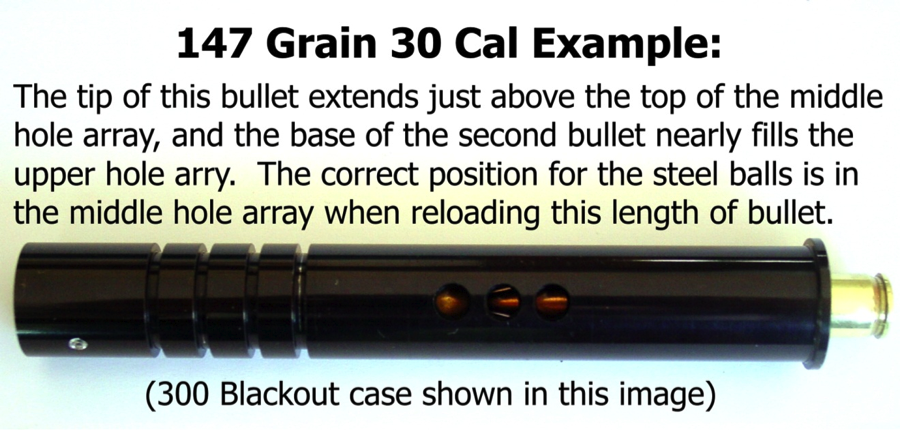
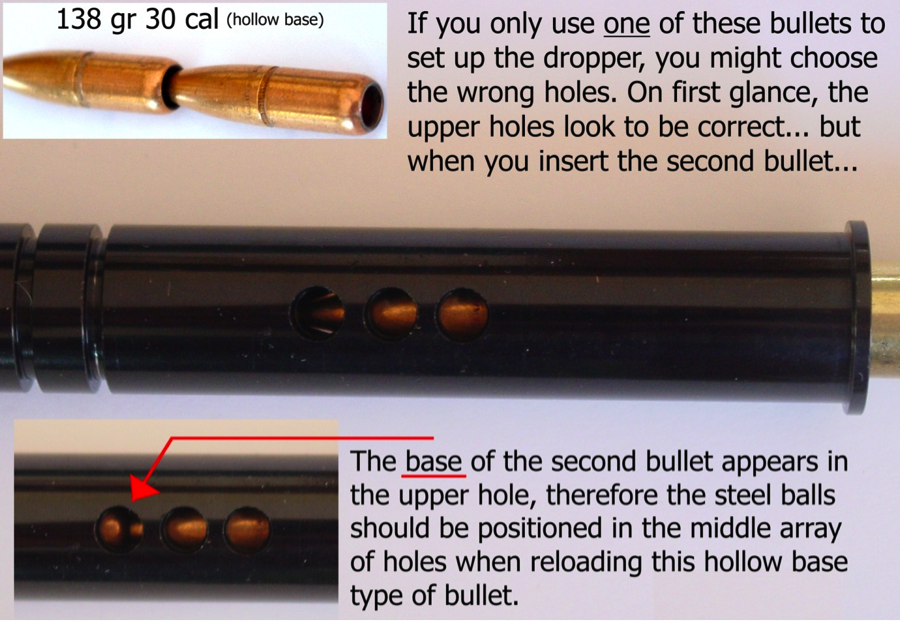
The most accurate way to determine which holes to use is by performing a simple visual check. Properly prepare a case and insert a bullet into the case mouth by hand. What you’re trying to do is simulate a bullet having been dropped into the case mouth by the dropper tube. It should sit in the case mouth and stay in position. Now, with the dropper tube disassembled, insert this case+bullet into the dropper tube and visually check which set of holes best aligns with the tip of the bullet. Remember that since the cases will always enter the dropper tube for a fixed distance and stop, different length bullets will appear at different positions within the tube. If you look at Fig E, it’s obvious that the short projectile is nowhere near extending up to the end of the upper holes, therefore you should be using the lower holes and clip position. In Fig F, you can see that a longer bullet extends up enough to reach the far edge of the upper holes, so the best dropper performance would be obtained by using the upper holes and clip position. Ideally, what you’re trying to do is determine the array of holes that will in the best position to allow the ball bearings to re-enter the dropper bore just below the base of the next bullet in the column.
The dropper tube and threaded die are made from hard anodized aluminum and should need no lubrication. If you choose to apply any lubricant, please do so sparingly and we would suggest a dry, Teflon based spray vs a liquid base lube. When disassembling the dropper, be careful not to lose the ball bearings. It’s a good idea to do any disassembly over a large bowl or pan with a paper towel at the bottom. That way, if the bearings slip from your fingers, they will fall into the bowl or pan (a few spare bearings are included with your unit).
Mounting and adjusting the dropper height
Do not mount the dropper at this time.
First… properly prepare a case and position it in the shellplate underneath where you will mount the dropper tube (this is generally the station immediately following the powder measure).
Depending upon the press you’re using… operate the handle to either raise the shellplate or lower the tool head. The case mouth will be approximately even with the top of the tool head.
Now, position the dropper above the station and while holding the inner tube from turning, begin to thread the die into the station for only 1 or 2 turns… just enough to allow it to remain in place. Then begin filling the dropper tube with bullets by hand until you can see them in the clear tube. Continue until the dropper micro-switch arm moves outward and remains in that position. The dropper tube should now be full.
Begin to slowly screw the threaded die more deeply into the tool head. The threaded die, inner drop tube and column of projectiles will all move downward together until the empty case mouth below contacts the inner bore of the dropper tube. At that point the inner tube and column of projectiles will stop moving downward, but you will still be able to continue threading the die downward slowly. After a few more turns you will see the column of projectiles suddenly drop down, tamping the lower one into the case mouth. From the point that the column fell, turn ¼ turn more and then lightly secure the lock nut. Remember… the threaded die is aluminum. Do not over tighten it and strip the threads. Very little force is needed and if you wish to make it more secure, use a little light or medium LocTite. The dropper is unlikely to become loose since there is little to force applied to the die in normal operation.
IMPORTANT NOTE
When the dropper is set-up with the ball bearings in the lower holes and clip position, be careful not to adjust the threaded die down any farther than ¼ turn past the point where the bullet column drops. After approximately ¾ more of a turn, the bottom flange of the dropper tube will contact the bottom of the threaded die. Then, any further tightening may damage the dropper tube flange. There is a little more extra room when the upper holes are used, but it’s best to follow the same guidelines… ¼ turn past the point that the bullet column fell should be adequate for proper operation.
As a final check, check that a bullet is dropped correctly. You should see the column of bullets fall just prior to the press handle completing its stroke. When the column of bullets drops… this indicates that the case has lifted the inner drop tube enough far enough to allow the ball bearings to move outwards, out of the dropper tube bore and into a chamber machined inside the threaded die. Once they clear the bore, there is no support for the column of bullets and it falls. The extra ¼ turn of “over-travel” you added when adjusting the threaded die assures that the ball bearings will exit fully from the bore. When the case holding the dropped bullet is withdrawn from the dropper tube, the ball bearings are forced back into the bore of the dropper tube and enter just below the base of the next bullet in the stack… thereby retaining the column of bullets for the next cycle.
The small diameter output tube spring assembly is used with rifle bullets (and some very short handgun 9mm-38cal bullets). On a fixed tool-head press like a Dillon 650, simply route the output tube spring down to the bullet dropper tube and attach its small cap to the top of the dropper. Your spring tube will most likely be more than long enough and might need to be trimmed a bit shorter. Never trim it so short that spring tension is applied to the top of the dropper tube. A small amount of slack in the spring tube is necessary for correct dropper tube operation. If you’re using a moving tool-head press like a Dillon 1050 however, do not trim your spring length. You will need to allow some slack in the spring tube so that when the moving tool-head goes up and down, no upward and/or lateral forces are applied to the bullet dropper. The bullet dropper must be allowed to rise and fall freely when operating on any reloading press.
A simple trick that works well for routing the output tube spring is to use a ½” wide rubber band to lightly secure the output tube spring up near the top of the powder measure reservoir (Fig G). On a 1050 press, route the output tube spring so that when the tool-head is up or down, some small amount of slack remains in the output tube spring in the section held from below the rubber band to the top of the dropper.
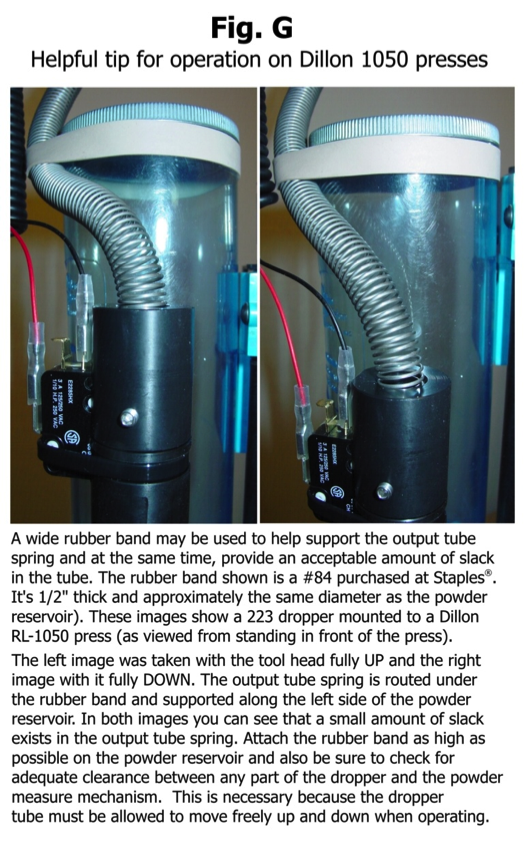
Be sure to also check for clearance between the bullet dropper and the powder measure mechanism… no rubbing/binding or interference with the body of the dropper tube or the metal clip.
Connection to collator
In Fig. H, you can see how the extended top funnel portion of the 223 switch section fits into the output tube spring cap. It‘s a close fit, so be careful not to damage the top funnel when assembling the cap to the dropper.

The setscrew is present to secure the cap to the top of the switch section. All that is required is that the setscrew enters the machined groove on the switch section. It will prevent the cap from coming off. Do not tighten the setscrew or you might distort the bore of the switch section and cause bullets to jam.
The power connection is not polarity sensitive. Either wire can connect to either terminal. Only the outer 2 micro-switch terminals are used. The center terminal has been bent over as a reminder to you not to use it. The coiled cord may be stretched a bit if necessary to relieve any significant lateral tension applied to the dropper tube.
Other Important Considerations
1. For consistent dropper operation, TRIM YOUR CASES TO LENGTH. If your cases vary substantially in length, and you initially adjust the dropper using a longer case, the shorter cases may not consistently cause the dropper to release bullets.
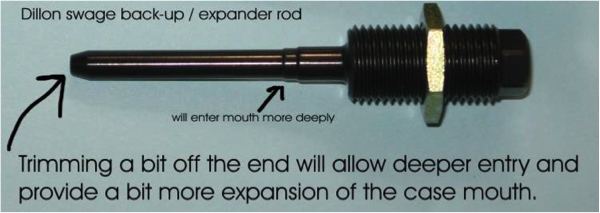
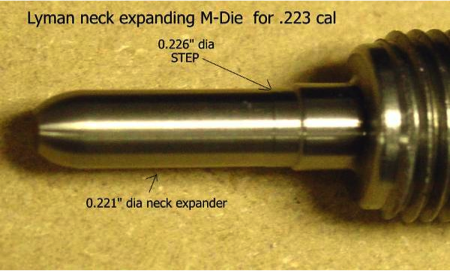
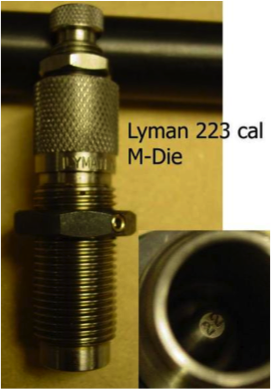
2. Use the swage/expander back-up rod. If reloading on a 1050 press, even if you do not swage the primer pockets, use the die that holds the swage back-up rod and adjust the rod as if you were going to swage the cases. Near the top of the .223 rod is an expander portion (approx .226” dia) which improves bullet tamping somewhat. Personally, I’ve found that trimming a small amount of material (.010”-.020”) from the end of the Dillon rod will give just a bit more expansion to the case mouth (you may have to case harden the tip again though). Additionally, some users have reported excellent results by using a Lyman M-Die in the swage position or during separate case preparation operations. (see photos on the next page)
3. In General: For best results reloading rifle bullets on ANY type of press, you will need to provide some amount of case mouth expansion in order to prevent the bullets from falling off of the cases when the press is indexed.
Case preparation for loading .223
When reloading 223 brass, is it always necessary to some case preparation, and most reloaders either have second press or a 2nd tool head set up to do that.
With many .223 bullets, you may experience bullets tipping over, unless you first throat your brass. This is true for all bullet feeders on the mark. This opening of the case mouth cannot be achieved in the powder station as it is with the pistol calibers, as that opening in the case is too small. So it has to be achieved as a preparation stage, before you reload the bullets.
If you are reloading on a 1050, you can use the swage expander rod to open up the brass a little.
Alternatively, you can use a Lyman M-die to flare the brass a little.
Most reloader will choose to trim and flare their cases as a first stage, before proceeding to reload.
308 Setup Information
Determining which set of holes and clip position to use when loading .308
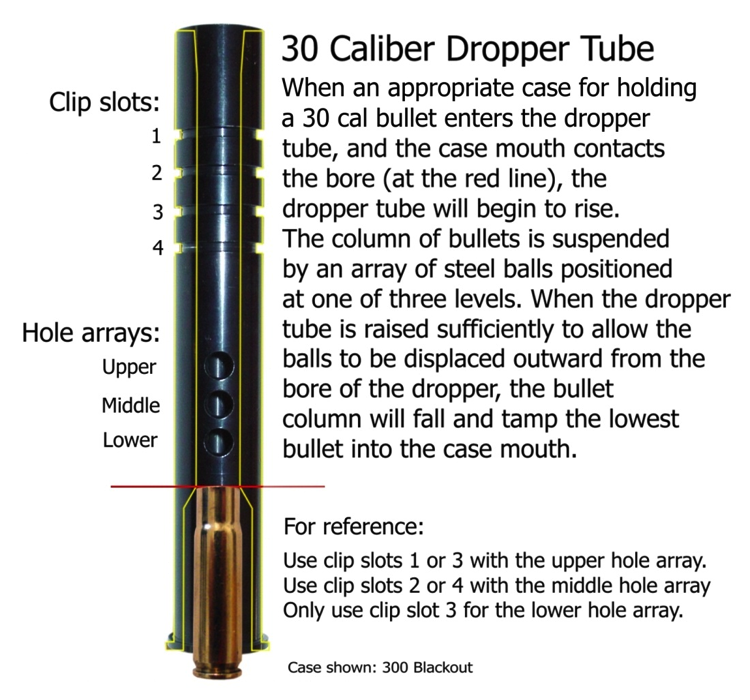
The .308 droppers provide 3 height options for steel ball bearings in the dropper, and 4 possible positions for the retention clip. This multitude of options is necessary due to the very wide range of bullets used in this caliber. The following pictures and text will help you understand how this works, and how to determine which level of holes and clip position you should use for your bullets.


Determining how to use your .308 collator plate
With the .308 we supply a complex collator plate, which is made of 2 parts. The upper section is about 18mm high, and the lower section attached to it with 3 pins, adds another 12mm to its height.
We ship the units with the spacer plate assembled in the collator as well, but depending on what bullet length you are loading, you may want to remove it first.
Simply turn the collator upside down and shake it to get the plates to fall out. Take care not to loose the nose guide spacers which may fall out as well. Then remove the lower spacer. The pins will remain in the spacer and should not fall out.
When placing the upper plate back in the collator, take care to move the dislodge arm out of the way as you place the plate back on the motor drive shaft.
Troubleshooting
Q: I installed my Bulletfeeder 7 months ago and have been very pleased with it. The last time I used it was about three weeks ago and when I turned it on just now nothing happened. No motor noise at all. I checked all the fittings and electrical source and everything is tight. Any suggestions? Am I missing something obvious?
Sounds like an electrical issue. Watch this video:
https://www.youtube.com/watch?v=U1XhW0_OwA0
it should hopefully give you the answer.
Q: I bought the .224 rifle mini bullet feeder. I have a Hornady Lock-n-Load auto press. I cant get the bullet feeder set to set the bullet in the case so the bullet stays in the case. the bullet always falls off when I lower the case. What do I have to do to get it to work? do I have to do something to stretch the case mouth open a little bit?
Yes, correct. Throating the brass mouth is required for most bullet types, and most reloaders of 223 do this as a prep stage while preparing their brass. You can read more about that here:
http://www.mrbulletfeeder.com/rifle-calibers/
Q: I just finished installing my Mr BulletFeeder. Here is a picture of my issue. Now, when I installed the dropper initially all the bullets were dropping one by one, I ran about 6 of them without any issue. Then I connected the brass piece and what was above and then the rest of the unit. Bullets are feeding from the unit to the dropper fine. It is just that they are not dropping one, but all of them at the same time. What should I do?
This will happen when there is too much tension on the output spring that connects to the bullet-feeder to the dropper-assembly when the tool head is in the down position so the dropper assembly is pulled up and releases more than one bullet.
Maybe you need to put the bullet feeder in a different position.
Q: Set up new Mr bullet feeder and every 10th bullets or so is upside down (very frustrating) tried adjusting speed and nose piece, it seems that one bullets tends to hang on top and throws next bullet to sit up side down using coated lead bullets brinell l #12, 125 grain 38 special.
You should be able to set up the bullet feeder to where you get zero upside down bullets. From your description it sounds to me like perhaps the issue is that the angle of the collator is too flat. Try to make it steeper, set the collator at a steeper angle and see if that helps to resolve the issue. It should. Play around with the angle, you may find that for your bullets 55deg works better than 45.
Q: With this, I have one unit in 9-mm, I figured that I could use this for 380 ACP too. I am using 100 grain bullets from Berry's. The issue however is that the bullets are shorter and the depth of the sprocket seems too deep. This allows for it to routinely drop them upside-down. I worked with this for a bit, but I figured I'd ask as moving the spacers was very delicate. One way too much, the other not enough. Finally, when the bullets did drop, they were able to wedge sideways in the spring and jam the works. Is there a spring with a smaller diameter for this?
Yes, we recommend that for very short 9mm/380 bullets the small output assembly is used instead of the larger one usually used for pistol calibers. This is the one supplied with the rifle calibers, and measures 10mm internally. It works much better with the 100gr bullets.
http://www.doublealpha.biz/mr-bulletfeeder-output-assembly
Q: Every once and a while I get two bullets that'll drop while loading on my Dillon 1050.
First, check to see the dropper is moving up and down freely loosely and quickly when you list if with you finger from below. It should. It must.
If it does not, check why not. could be touching the powder dropper, could have dirt or a burr in it, could have a cracked threaded die body (these are sometimes broken by users over tightening them like a steel die…)
If the dropper moves up and down smoothly – next check the issue is not simply upside down bullets. An upside-down bullet may well exit with the one below it… if that is the case – the collator needs adjusting, and primarily the nose guide piece. You should be able to adjust to where you get zero upside-down bullets.
Then, and this is the most common cause on 1050’s – too much side pressure on the spring when the tool head is lowered. Just a little side tension can cause friction in the die bodie and prevent the dropper from working as it should. Try to run the dropper without the spring attached, fill it by hand again and again and see if the issue still occurs. If it does not – the cause is spring pressure. Get the collator closer!